Creating your mail merge template
This guide will show you how to compose your email in Outlook and add personalization tokens from your data source (spreadsheet or address book contacts).
Contents
Step 1. Creating your email template
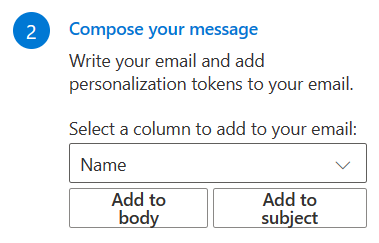
You can start writing your message and when you want to add a field from the spreadsheet (a “Personalization token”) you can select it from the dropdown and use one of the buttons to add it to the body or the subject line.
If you prefer you can also simply type the personalization token yourself by adding two curly braces around the column name.
We recommend using column names without spaces, then the token looks like this {{ColumnName}} but spaces are supported, but require this format: {{ ["Column Name"] }}
Make sure you have not misspelled anything when you send yourself a test email which will contain the first row of data from your spreadsheet.
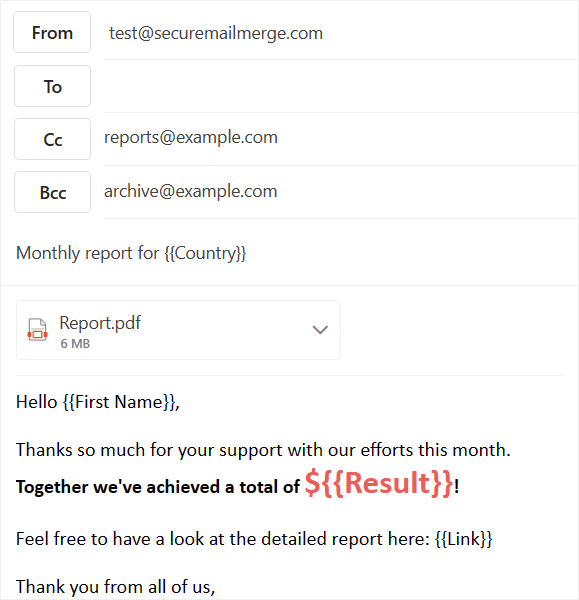
You can use most of the features you know from writing e-mails in Outlook. You can add CC and BCC recipients, which will be added to each of the generated emails. The “To” field will be ignored and replaced with the recipient’s email.
You can use any of the text formatting options available. Note that we recommend writing your email text first adding your personalization tokens as you go and then apply formatting as the last step. You can also add attachments and inline images.
When changing the “From” address to an alias, make sure to select an address that you have “Send As” rights for. Otherwise sending the email will fail.
Step 2. Send a test email
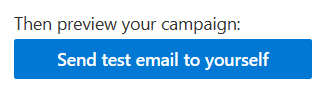
This will generate a test email using the first row of data from your spreadsheet. Instead of sending it to the recipient it will be sent to you, but otherwise it will resemble the final campaign email.
When you click the button you will be asked to authenticate with Microsoft 365. You must login with the account you wish to send from.
Make sure all your personalization tokens have been replaced and the email looks as you expect it to. If you have used a more complex design it is recommended to view the test email in all major email clients to ensure it is displayed correctly.
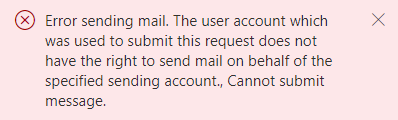
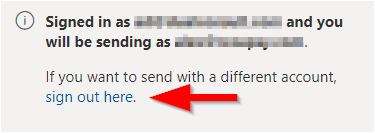
If you receive an error that you are not allowed to send from this account use the provided link to sign-out first and sign-in again with the correct account.
Step 3. Send your campaign
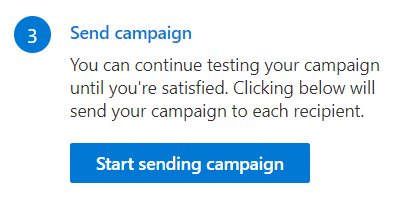
You can send yourself as many test emails as you want until you are satisfied with the result. Then you can start sending the campaign.
Because SecureMailMerge sends your campaign from within your Outlook client we recommend opening the email in a new window so you can leave it running in the background.
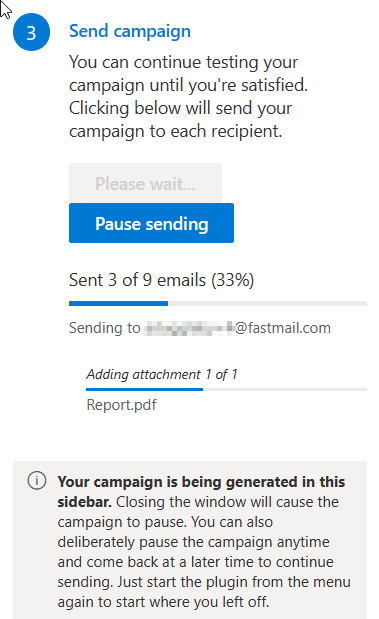
As your campaign is generated you will see the progress bar for each recipient. If you have attached attachments to your email they will need to be uploaded for each recipient and this may take some time but you will see a seperate progress bar for each attachment.
You can find the email generated for each recipient in your Sent Items. Once the sending is finished you can start a new campaign with the same email, save the email as a template or just save it as a draft for future use.
Click the “Pause sending” button at any time to pause the campaign. The current email being sent will finish sending, but then the campaign will be paused.
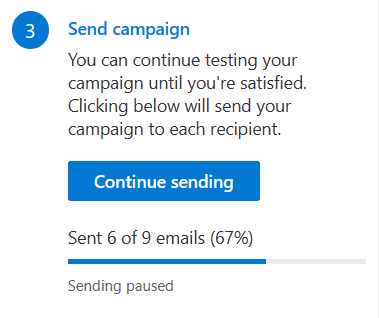
You can resum the campaign by clicking “Continue sending” at any time.
If anything happens during sending (e.g. you accidentally close the window, your computer crashed etc) you can resumt the campaign simply by opening the email from your Drafts folder and starting the SecureMailMerge add-in again. It will pick up from the last email that was successfully sent.
Date formatting
If your spreadsheet contains dates, SecureMailMerge will try to preserve the formatting you see in Excel. For full control over how dates appear in your emails, you can use Excel’s =TEXT() function. See our date formatting guide for details.
More help on advanced use cases
Are you looking for specific use cases, check out our help site with detailled guides on different scenarios. Reach out to our support if you’re trying something that we don’t have a guide for yet and we will do our best to document it.
→ Click here to go to our help page (e.g. multiple CC/BCC, personalized attachments etc)