How do I set a reply-to address for my mail merge?
Learn how to set a custom reply-to email address so that recipient replies go to a different address than the one you send from.
Contents
SecureMailMerge lets you set a custom reply-to address on all messages in your campaign. When a recipient clicks “Reply” in their email client, their response will be addressed to the reply-to address instead of your sending address.
This is useful when you want to:
- Send from your personal address but have replies go to a shared mailbox or team inbox
- Direct replies to a colleague or assistant
- Route responses to a dedicated address for tracking or processing
Setting the reply-to address
1. Open Advanced Campaign Options
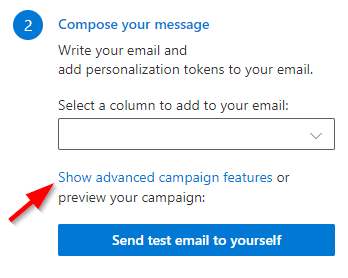
In the campaign manager, select the link titled “Show advanced campaign features” to open the advanced options.
2. Enter the reply-to email address
In the advanced options, find the field labelled “Set reply-to email address on all messages” and enter the email address where you want replies to go.
SecureMailMerge will validate that the address is a properly formatted email address before sending.
3. Send your campaign
The reply-to address will be applied to every message in your campaign, including the test email. You can verify it works correctly by sending a test email first and checking the reply-to address in your email client.
Things to know
- One address per campaign. The reply-to address is the same for all recipients in the campaign. It cannot be personalised per recipient using merge tokens.
- Single address only. You can set one reply-to address, not multiple.
- Saved with your campaign. The reply-to setting is saved as part of your campaign, so if you resume a campaign later, the setting will still be there.
- Reset on new spreadsheet. Uploading a new spreadsheet resets all advanced options, including reply-to.
- Works with all email clients. The reply-to header is a standard email feature supported by all major email clients.