How do I send different attachments to each recipient?
Instead of sending the same attachment to each recipient, learn how to send a mail merge with individual attachments using SecureMailMerge.
Contents
Step 1. Prepare all files in a single folder on your computer.
All files used for individual attachments must be in a single folder on your hard drive. You will be asked to select them all in a later step. Use the file names in the next step to associate them with a recipient.
Step 2. Add a column called “Attachments” to your spreadsheet.
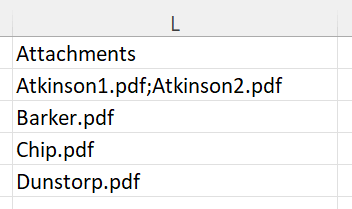
Add a column to your spreadsheet called “Attachments”. Add the names of the files in the cell for each recipient. You can add multiple files by separating them with a semi-colon.
Step 3. Upload files
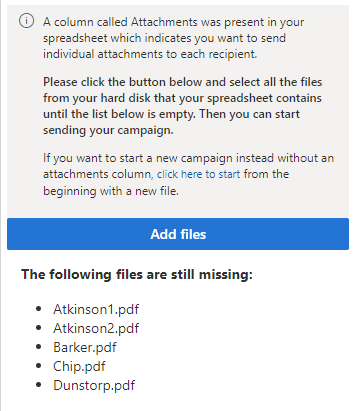
The Attachments column will be detected and you will be asked to upload the files it has found. You must upload all files in the spreadsheet by clicking on “Add files ”.
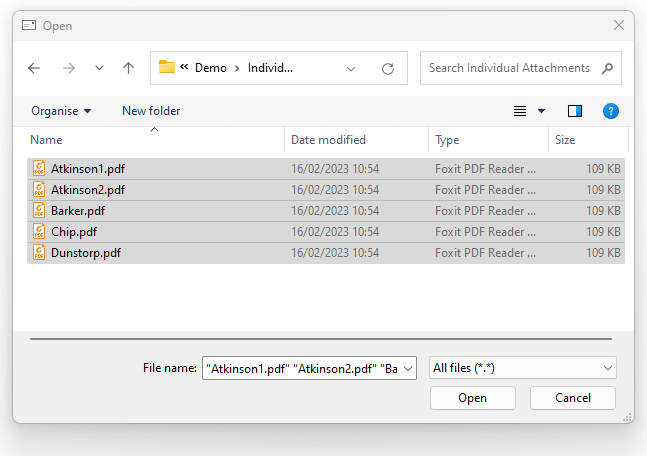
The file browser will open and you can press the CTRL + A key to select them all. Then click “Open”
Step 4. Test and send your campaign
Once you’ve uploaded all files you can now send a test and then send the actual campaign.
→ Click here for our guide on personalizing your email.
If you close the plugin and re-open it, or pause and then continue campaign sending, you will have to repeat Step 3 again and upload all the files. The files that have already been sent will not be sent again, but in order to validate the spreadsheet all files must be uploaded.
Common Mistakes and How to Fix Them
SecureMailMerge automatically detects common mistakes when uploading individual attachments and provides helpful guidance. Here are the most frequent issues and how to resolve them:
1. Missing File Extensions in Spreadsheet
Problem: Your spreadsheet contains filenames without extensions (e.g., “document”), but your uploaded files have extensions (e.g., “document.pdf”).
Example:
- Uploaded file:
contract.pdf - Spreadsheet entry:
contract
How to fix:
- Add the file extension to your spreadsheet entries: change “contract” to “contract.pdf”
- Or rename your files to remove the extensions (not recommended)
2. Duplicate File Extensions
Problem: Your files have duplicate extensions like file.pdf.pdf. This commonly happens when Windows Explorer hides file extensions and you manually add the extension when renaming files.
Example:
- Uploaded file:
invoice.pdf.pdf - Expected in spreadsheet:
invoice.pdf
How to fix:
- Check if Windows Explorer is hiding file extensions:
- Open Windows Explorer
- Click the “View” tab
- Check “File name extensions” to show them
- Rename your files to remove the duplicate extension
- Or update your spreadsheet to include the duplicate extension
3. Case Sensitivity Issues
Problem: File names have different capitalization than what’s in your spreadsheet.
Example:
- Uploaded file:
Document.PDF - Spreadsheet entry:
document.pdf
How to fix:
- Ensure the capitalization matches exactly between your files and spreadsheet
- Either rename your files or update your spreadsheet entries
4. Invalid File Paths in Spreadsheet
Problem: Your spreadsheet contains full file paths instead of just filenames.
Invalid examples:
C:\Users\Documents\filename.pdf/Users/Documents/filename.pdffolder\filename.pdf
Correct format:
filename.pdf
How to fix:
- Remove any folder paths from your spreadsheet
- Only include the filename with its extension
5. Multiple Files Per Recipient
You can send multiple attachments to a single recipient by separating filenames with semicolons in your spreadsheet:
Example:
contract.pdf;invoice.docx;specifications.xlsxImportant notes:
- Use semicolons (
;) to separate multiple files - Spaces around semicolons are automatically removed
- Each file must still be uploaded individually
6. Troubleshooting Upload Issues
If SecureMailMerge shows a warning about unmatched files:
- Check the error message carefully - it will show you exactly which files don’t match
- Compare filenames character by character - even a single character difference will cause a mismatch
- Verify file extensions - both the file and spreadsheet entry must have matching extensions
- Check for hidden characters - copy-paste issues can sometimes introduce invisible characters
7. Best Practices for Individual Attachments
- Use consistent naming: Stick to lowercase filenames to avoid case sensitivity issues
- Include extensions: Always include file extensions in your spreadsheet
- Organize files: Keep all attachment files in a single folder for easy selection
- Test with a small batch: Start with 2-3 recipients to verify everything works correctly
- Check file sizes: Large attachments may cause email delivery issues
8. File Size Limitations
Keep in mind that most email systems have attachment size limits:
- Outlook.com/Hotmail: 25 MB total
- Gmail: 25 MB total
- Corporate email: Varies by organization (often 10-25 MB)
For large files, consider using cloud storage links instead of direct attachments.