Know how directly from the Microsoft 365 mail merge experts
How to Do a Mail Merge: Complete Beginner's Guide (2026)
By Alex Duggleby · Founder, SecureMailMerge
If you need to send the same email to a hundred people — but with each email addressed personally — a mail merge is what you want. Instead of writing a hundred separate emails, you write one template, connect a spreadsheet, and let the software do the rest.
This guide explains what mail merge is, how it works, and exactly how to do one from Outlook.
What is a mail merge?
A mail merge takes a single document template and a data source (usually a spreadsheet), combines them, and produces individual personalised outputs.
The template contains merge fields — placeholders that look like {{FirstName}} or «Company» — that get replaced with real values for each row in your spreadsheet.
Example:
| Template | Row 1 result | Row 2 result |
|---|---|---|
Dear {{FirstName}} | Dear Alice | Dear Bob |
Invoice {{InvoiceNumber}} | Invoice INV-001 | Invoice INV-002 |
Each recipient gets their own individual email. From their perspective, the email was written specifically for them.
What mail merge is used for
Mail merge is useful any time you need to send the same core message to many people with individual differences:
- Customer invoices — different amounts, dates, and numbers per customer
- Event invitations — personalised with attendee name and seat/table number
- Employee communications — payslips, annual reviews, policy updates
- Sales outreach — personalised with company name and specific pain points
- Newsletters — recipient name, location-specific content, subscription details
- School or university communications — results, enrolment info
The three components of every mail merge
Every mail merge requires the same three things:
- A data source — a spreadsheet (Excel or CSV) with one row per recipient and columns for each piece of personalisation data.
- An email template — the message you want to send, with merge fields in place of individual values.
- A sending tool — software that combines the data with the template and sends individual emails.
How to do a mail merge in Outlook
There are two ways to mail merge in Outlook: the classic Word method and a faster native add-in. Here’s a quick guide to both.
Method 1 — Word + Excel + Outlook (classic)
This method uses Word’s Mailings tab and requires Classic Outlook (not New Outlook) as your default email app.
Step 1: Set up your Excel spreadsheet
Create a spreadsheet with one row per recipient. Add at minimum:
- A To column with email addresses
- A FirstName column (or whatever personalisation you need)
Keep column names short with no spaces (FirstName not First Name).
Step 2: Start the mail merge in Word
- Open Word.
- Go to Mailings → Start Mail Merge → E-mail Messages.
Step 3: Connect your spreadsheet
- Click Select Recipients → Use an Existing List.
- Open your Excel file and select your worksheet.
Step 4: Write your email and insert merge fields
Write the email body. Where you want personalised data, click Insert Merge Field and choose a column name. Word inserts a field like «FirstName».
Step 5: Preview and send
- Click Preview Results to verify the output.
- Click Finish & Merge → Send Email Messages.
- Select the column with email addresses, enter a subject line, and click OK.
Outlook sends one individual email to each row in your spreadsheet.
Doesn't work in New Outlook
The “Send Email Messages” step requires Classic Outlook set as your default email app. If you use New Outlook, this final step doesn’t work. See mail merge in New Outlook for the fix.
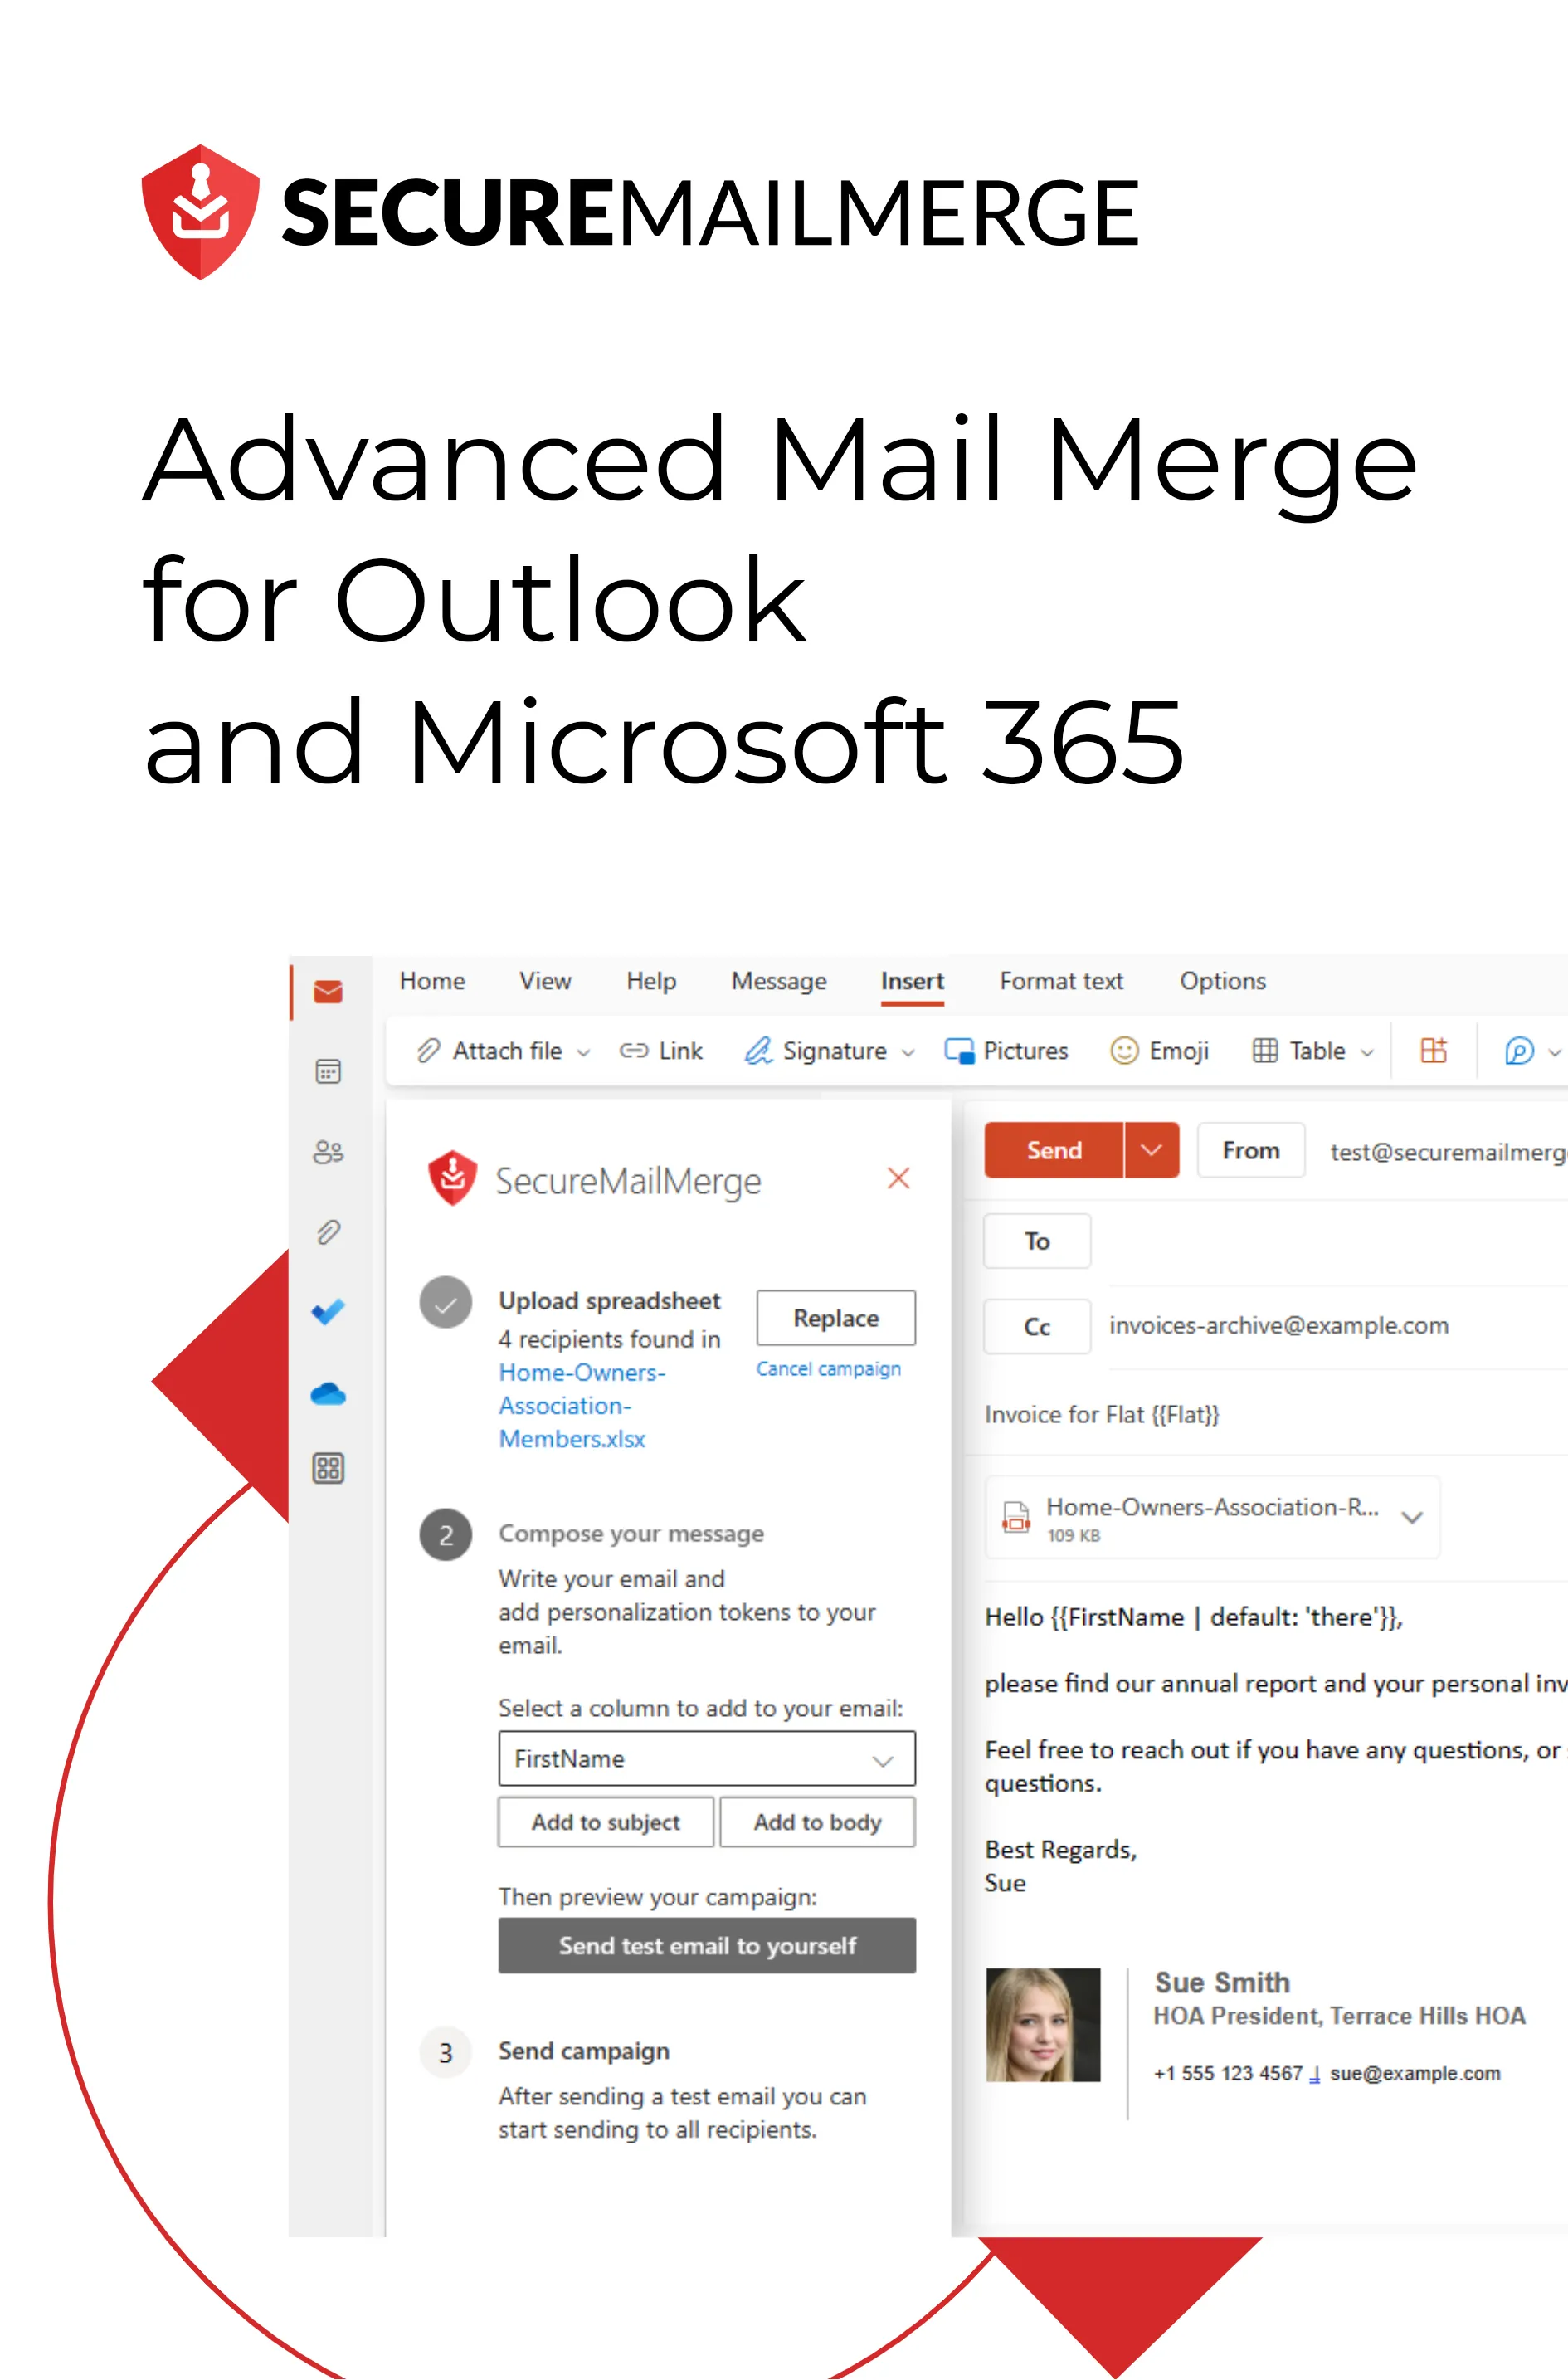
Method 2 — SecureMailMerge add-in (faster, works everywhere)
The SecureMailMerge add-in runs directly inside Outlook — no Word needed — and works in Classic Outlook, New Outlook, Mac, and Outlook on the Web.
Step 1: Install the add-in In Outlook, click Apps (or Get Add-ins), search for SecureMailMerge, and add it. Free to install.
Step 2: Open a new email Start composing a new email. Click the Campaign Manager icon (it appears in the toolbar or Apps menu).
Step 3: Upload your spreadsheet Click “Use Spreadsheet” and select your Excel or CSV file.
Step 4: Write your email
Use {{FirstName}} tokens in the subject and body. A dropdown picker shows all available fields from your spreadsheet.
Step 5: Send a test, then send for real Click “Send Test Email” to verify the output. Then click “Start Sending Campaign.”
That’s it. Outlook sends individual personalised emails to everyone in your spreadsheet.
Best practices for mail merge
Clean your data first. Blank cells in the email address column will produce failed sends. Extra spaces in name fields look unprofessional. Spend two minutes reviewing your spreadsheet before running the merge.
Always send a test email to yourself. Run a test on the first row before sending to the full list. You’ll catch field name mismatches, formatting issues, and awkward phrasing before anyone else sees them.
Keep list sizes manageable. Microsoft 365 accounts have sending limits (typically 10,000 per day for Business plans, 300 per day for Personal plans). Split large campaigns into daily batches.
Personalise the opening line. “Dear Alice” is the minimum. If you have more data (company, recent purchase, location), use it. The more specific the personalisation, the higher the engagement.
Match the personalisation to the tone. Formal invoices can open with “Dear Mr Smith.” Friendly newsletters work better with “Hi Alice.” Choose based on your relationship with the recipient list.
Mail merge field syntax
Different tools use different placeholder syntax:
| Tool | Syntax |
|---|---|
| Word (classic) | «FirstName» |
| SecureMailMerge | {{FirstName}} |
| Google Docs | {{First Name}} |
In all cases, the placeholder must exactly match your column header (including capitalisation).
Troubleshooting common mail merge problems
Fields showing placeholder text instead of real data The column name in your spreadsheet doesn’t match the field name in your template. Check capitalisation and spacing.
Emails not sending / stuck in Outbox Outlook may be in Offline Mode. In Outlook: Send/Receive → toggle off Work Offline.
Merge not starting in Classic Outlook Verify that Classic Outlook (not New Outlook) is set as the default email application in Windows Settings → Apps → Default Apps.
Numbers or dates displaying incorrectly
Format the column in Excel before connecting it to Word. Excel stores 2024-01-15 as a number internally; format it as a date in the cell format settings so it appears correctly in the merge.
FAQ
What software do I need to do a mail merge? You need a spreadsheet (Excel or Google Sheets), a template (Word, Outlook, or a mail merge tool), and a sending mechanism (Outlook or a mail merge add-in). All of these are included with Microsoft 365.
Can I do a mail merge in Outlook without Excel? Yes. You can type a list directly in Word, import a CSV file, or use your Outlook Contacts as the data source. Excel is the most flexible option but it’s not required.
Can I do a mail merge from Gmail? Not with Word. Gmail has its own ecosystem (Google Docs + Google Sheets + Gmail merge tools). This guide focuses on the Outlook/Microsoft 365 workflow. See our guide to Microsoft 365 email marketing for context.
How long does a mail merge take to send? Outlook sends emails one at a time. For 100 emails, allow 2–5 minutes. For 1,000 emails, allow 20–30 minutes depending on email size and your connection speed.
Is mail merge safe? Will recipients know it’s a mass email? Each recipient receives a separate individual email with no “To” field showing other addresses. If your personalisation is good, they won’t know it’s a merge — it looks like a one-to-one email.
Related guides:
Enjoyed this article?
We have a whole library of useful articles for you to read
Show me the library of Outlook articles