Know how directly from the Microsoft 365 mail merge experts
How to Mail Merge from Excel to Word: Step-by-Step Guide (2026)
By Alex Duggleby · Founder, SecureMailMerge
The classic mail merge workflow — Excel as the data source, Word as the template, Outlook as the delivery engine — has been a staple of Microsoft 365 since Office 2007. If you’re looking to send personalized emails at scale, this is probably the first method you’ll encounter.
This guide walks through the full process, flags the common failure points (including what breaks in New Outlook), and shows a faster alternative that skips Word altogether.
What you need
- Microsoft Excel (any recent version)
- Microsoft Word (any recent version)
- Classic Outlook set as your default email client on Windows
New Outlook users
If you use New Outlook or Outlook on the Web, the Word-based mail merge will not work — Microsoft removed that integration. See the faster method below, or see the full mail merge in Outlook guide.
Step 1 — Create your Excel spreadsheet
Your spreadsheet is the data source. Each row becomes one email; each column becomes a merge field you can insert into the email template.
At minimum you need:
| Column | Purpose |
|---|---|
| To | Recipient email address (required) |
| FirstName | Personalisation field (optional but recommended) |
| Any other column | Any data you want to appear in the email |
Practical tips:
- No spaces in column names.
FirstNameworks;First Namecauses problems when inserting fields in Word. - One email per row. If a recipient needs two emails, add two rows.
- Save as .xlsx (not .csv) for the cleanest connection with Word.
Example spreadsheet layout:
| To | FirstName | Company | InvoiceNumber | Amount |
|---|---|---|---|---|
| [email protected] | Alice | Acme Corp | INV-001 | $1,200 |
| [email protected] | Bob | Widget Ltd | INV-002 | $850 |
Step 2 — Open Word and select E-mail Messages
- Open a new blank document in Word.
- Go to the Mailings tab in the ribbon.
- Click Start Mail Merge.
- Select E-mail Messages from the dropdown.
The document is now in mail merge mode. It looks like a regular document, but Word is treating it as an email template.
Step 3 — Connect your Excel file
- Click Select Recipients in the Mailings ribbon.
- Choose Use an Existing List.
- Navigate to your Excel file and open it.
- A dialog will ask which sheet to use. Select the sheet containing your data and click OK.
Word is now connected to your spreadsheet. The Edit Recipient List option becomes available — you can use it to filter or sort recipients before sending.
Step 4 — Write your email body
Write the full email in the Word document. Use plain text and formatting just as you would in a normal Outlook email.
When you reach a point where you want to insert personalised data:
- Place your cursor at that point.
- Click Insert Merge Field in the ribbon.
- Choose the column name from the dropdown (e.g.
FirstName,Company).
Word inserts a field code like «FirstName». At send time this is replaced with the real value from your spreadsheet.
Example email opening:
Dear «FirstName»,
Please find your invoice «InvoiceNumber» for «Amount» attached.
Format numbers and dates correctly
Merge fields display data exactly as it is stored in Excel. If your Amount column contains 1200 but you want $1,200.00, format the Excel column as Currency before connecting it to Word.
Step 5 — Preview your merge
Click Preview Results in the Mailings tab. The field codes are replaced with real data from your spreadsheet.
- Use the arrow buttons to scroll through recipients and check each one.
- If a field shows blank or incorrect data, go back to your spreadsheet and fix it, then re-connect using Select Recipients again.
- Check for awkward formatting — extra spaces, odd capitalisation.
Step 6 — Send via Outlook
- Click Finish & Merge in the ribbon.
- Select Send Email Messages.
- In the To field dropdown, choose the column containing email addresses (e.g.
To). - Enter a Subject Line. Note: the subject line is the same for all recipients — you cannot insert merge fields here.
- Leave the format set to HTML.
- Click OK.
Word passes each individual email to Classic Outlook, which sends them from your mailbox.
This fails in New Outlook
“Send Email Messages” only works when Classic Outlook is your system default email application. If New Outlook is the default, this step silently fails. Check: Settings → Apps → Default Apps → Email.
Common problems
“Send Email Messages” is greyed out Classic Outlook is not the default email app. Change the default and try again.
Merge fields showing «» instead of data
The column name in Excel doesn’t match the field name you inserted. Check for spaces, capitalisation differences, or leading/trailing whitespace in the column header.
Emails going to Outbox but not sending Outlook is in Offline Mode. Click the Send/Receive tab → Work Offline to toggle it off.
All recipients getting the same email without personalisation
You likely inserted the field text manually (typing FirstName) instead of using Insert Merge Field. Delete the manual text and use the Insert Merge Field dropdown.
Limitations of this method
The Word–Excel–Outlook mail merge is free and built in, but it has real constraints:
- No individual attachments. Every recipient gets the same attachment (if any).
- No subject line personalisation. The subject is the same for all recipients.
- Broken in New Outlook. Microsoft has not added this feature to New Outlook.
- Slow for large lists. Word can struggle with lists over 500 rows.
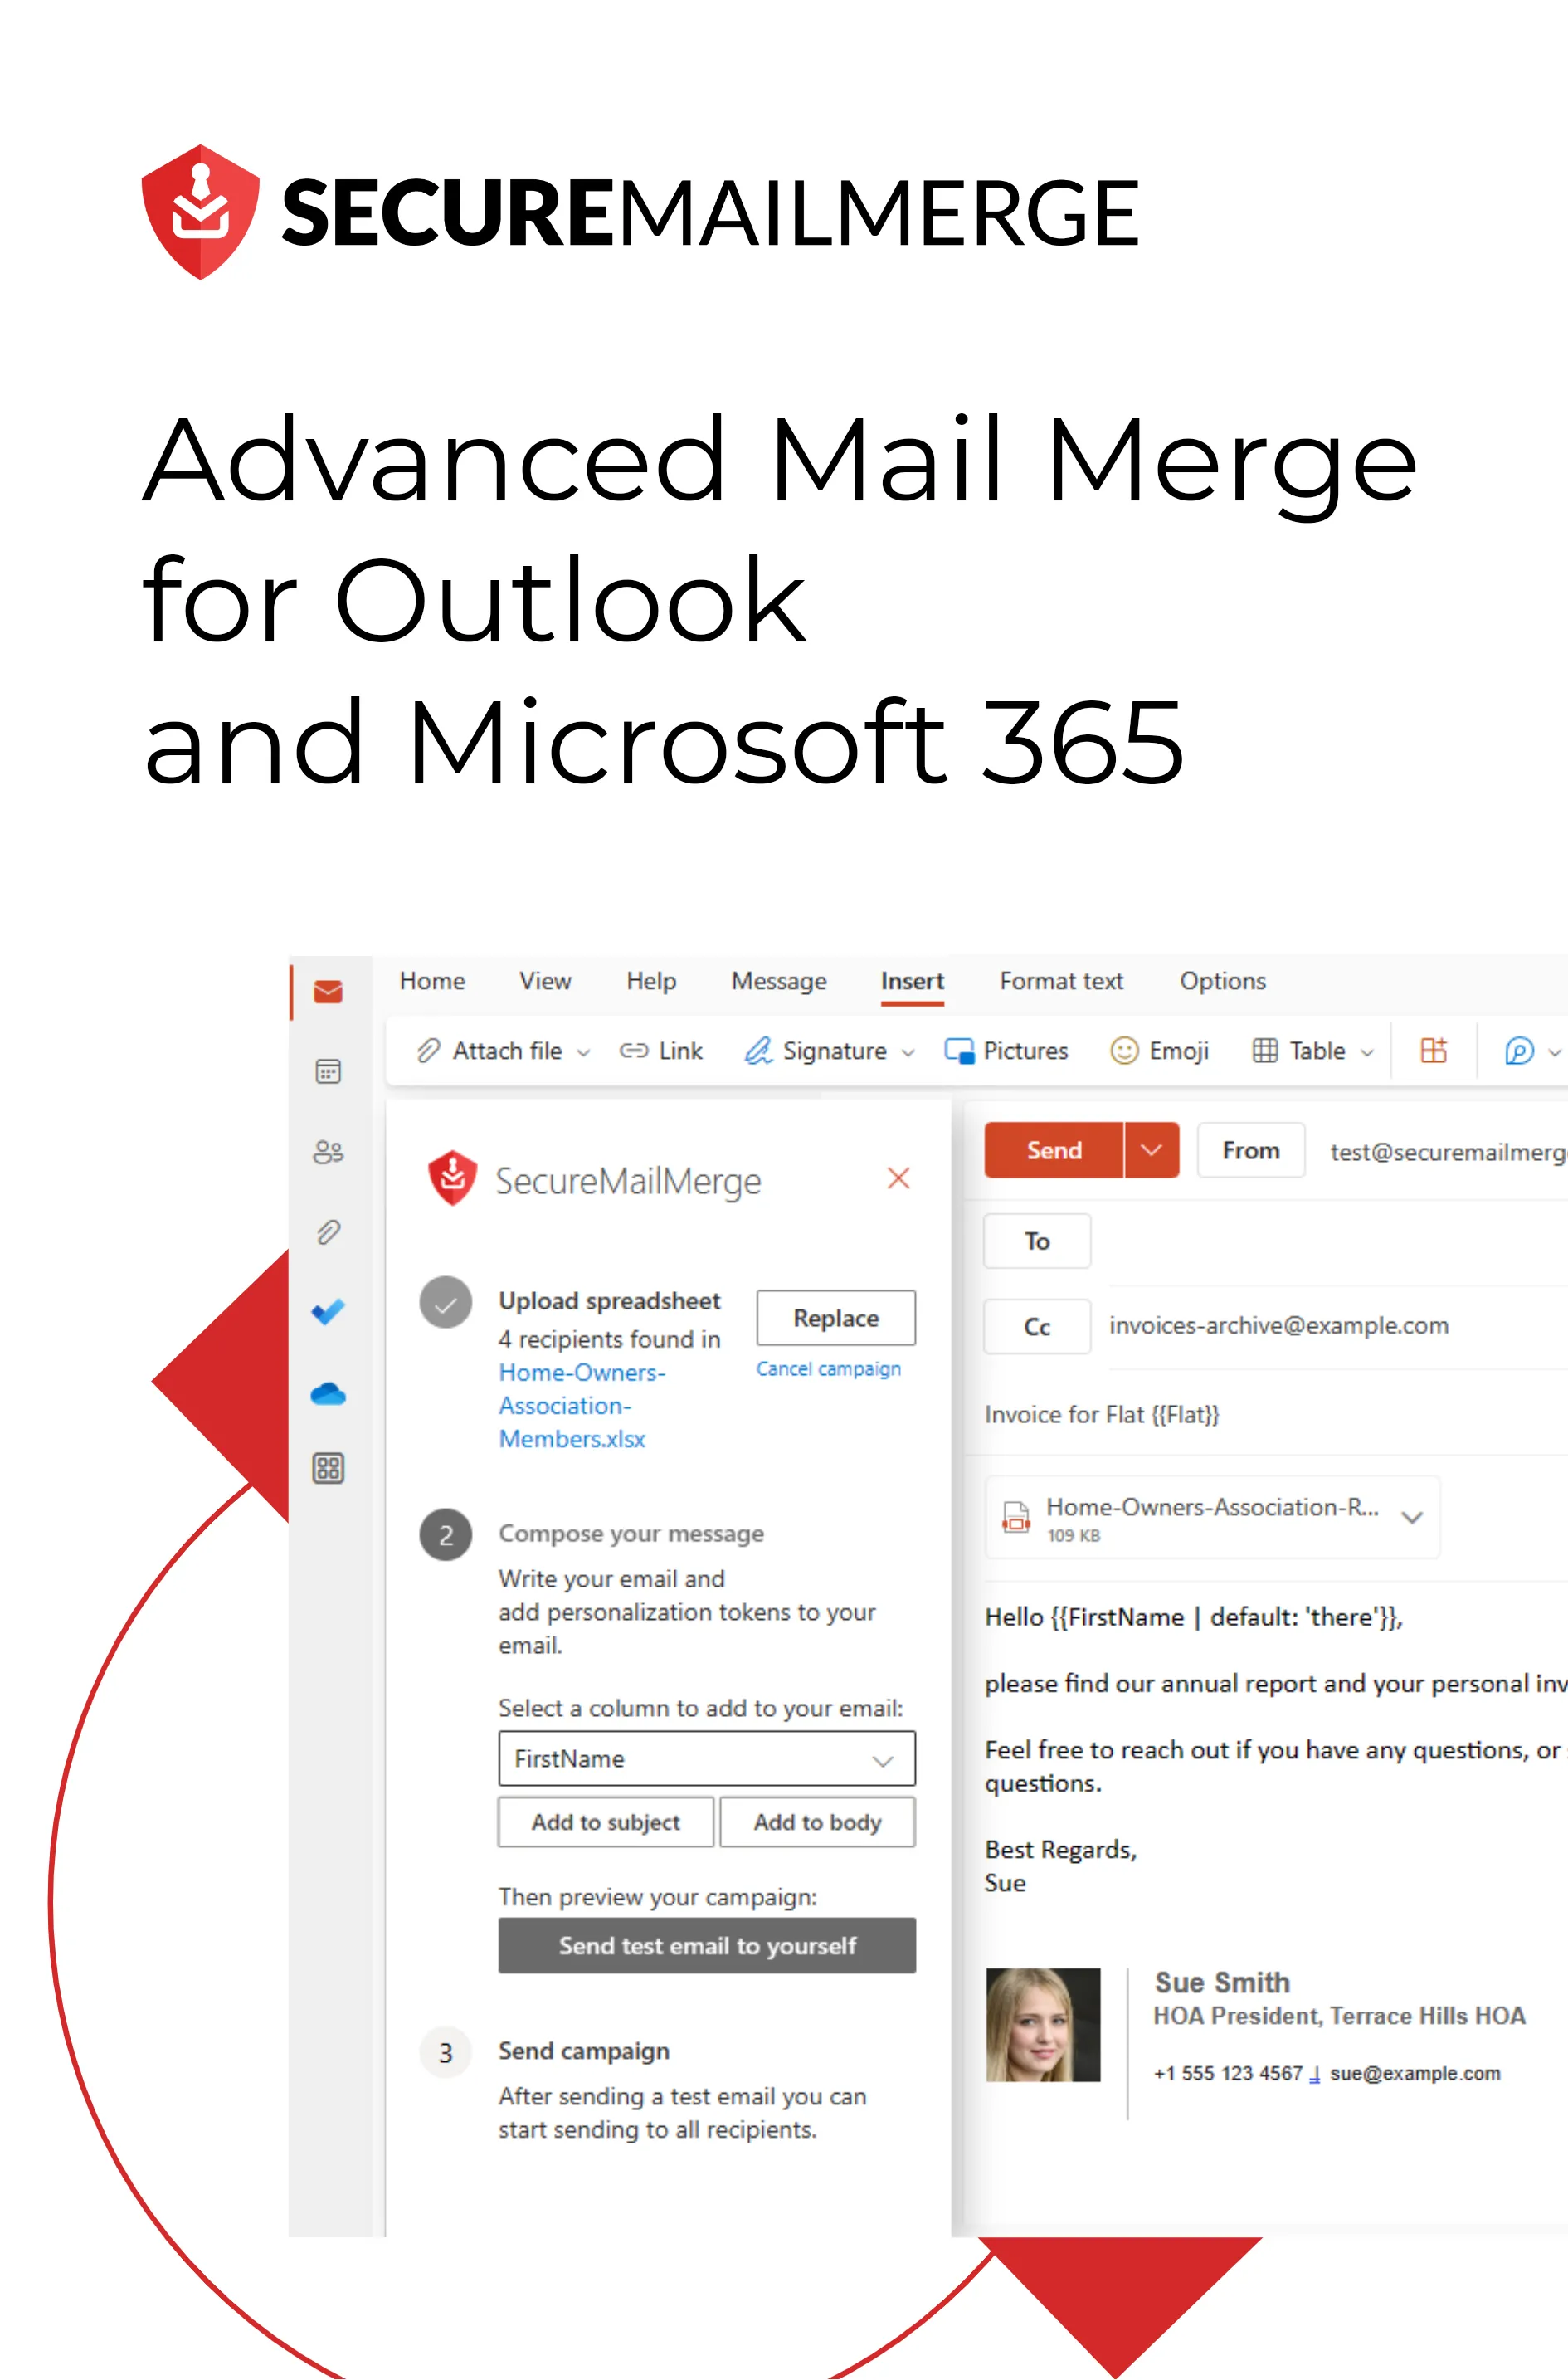
The faster method: skip Word entirely
The SecureMailMerge add-in does the same job directly inside Outlook — no Word, no wizard, no risk of the “wrong default email client” problem.
- Install SecureMailMerge from the Microsoft AppSource (free tier available).
- Open a new email in Outlook. Click the Campaign Manager icon in the Apps menu.
- Upload your spreadsheet (same Excel file you’d use for Word).
- Write your email using the
{{FirstName}}token syntax, with a dropdown picker to insert fields. - Send a test email to yourself, then click Start Sending Campaign.
Works in Classic Outlook, New Outlook, Outlook for Mac, and Outlook on the Web.
FAQ
Can I mail merge from Excel to Outlook without Word? Yes. The SecureMailMerge add-in connects directly to your Excel spreadsheet from inside Outlook and handles the entire merge without opening Word.
Can I personalise the subject line in a Word mail merge? No — the subject line in Word’s “Send Email Messages” dialog is static. To personalise subject lines, use the SecureMailMerge add-in, which supports merge tokens in both the subject and body.
Does mail merge from Excel to Word work on Mac? It works on Mac in a limited way — Word on Mac can perform the merge but sending via the Classic Outlook for Mac desktop app has historically been unreliable. The SecureMailMerge add-in is the recommended approach for Mac users.
How many rows can my Excel spreadsheet have? Word can struggle above 500–1,000 rows. For large lists, use the SecureMailMerge add-in or split into batches.
Related guides:
Enjoyed this article?
We have a whole library of useful articles for you to read
Show me the library of Outlook articles