Know how directly from the Microsoft 365 mail merge experts
How to Create an Outlook Email Template That Wins You Clients
This is your call to craft compelling emails, boost your brand image, and win clients with every click of the “Send” button.
Did you know that 86% of professionals prefer email as their primary channel for business communication? With such a staggering number, it’s clear that mastering the art of email correspondence can significantly impact your business’s success.
By the end of 2023, over 4.4 billion email users will be worldwide. With such a vast audience, it becomes crucial to leverage email templates strategically to stand out in a crowded inbox.
But how can you create an email template in Outlook that saves you time and wins you, clients?
In this guide, we’ll unveil the secrets to crafting compelling email templates that leave a lasting impression and drive meaningful results, discuss their numerous benefits, and provide actionable steps to create compelling templates from scratch.
So let’s dive into the world of Outlook email templates and unlock the secrets to effective client engagement!
Why Create Email Template in Outlook?
While a well-crafted subject line and personalized content are essential elements of effective email communication, creating Outlook email templates takes it further.
Email templates provide a structured and efficient way to engage with clients, streamline your messaging, and leave a lasting impression. They allow you to improve response rates, simplify workflows, and lead to more conversions.
Personalized communication has become more critical as businesses strive to build strong relationships with their target audience.
A recent study revealed that every $1 spent on email automation and marketing leads to a return on investment (ROI) of $40. This emphasizes the need for tailored templates that resonate with recipients and drive them to take action.
But those aren’t all the benefits.
5 Benefits of Using Email Templates
We must answer the why before we answer ‘how to create an email template in Outlook.’
So here are all the benefits you can expect simply by personalizing your email templates on Outlook for future campaigns or day-to-day correspondence:
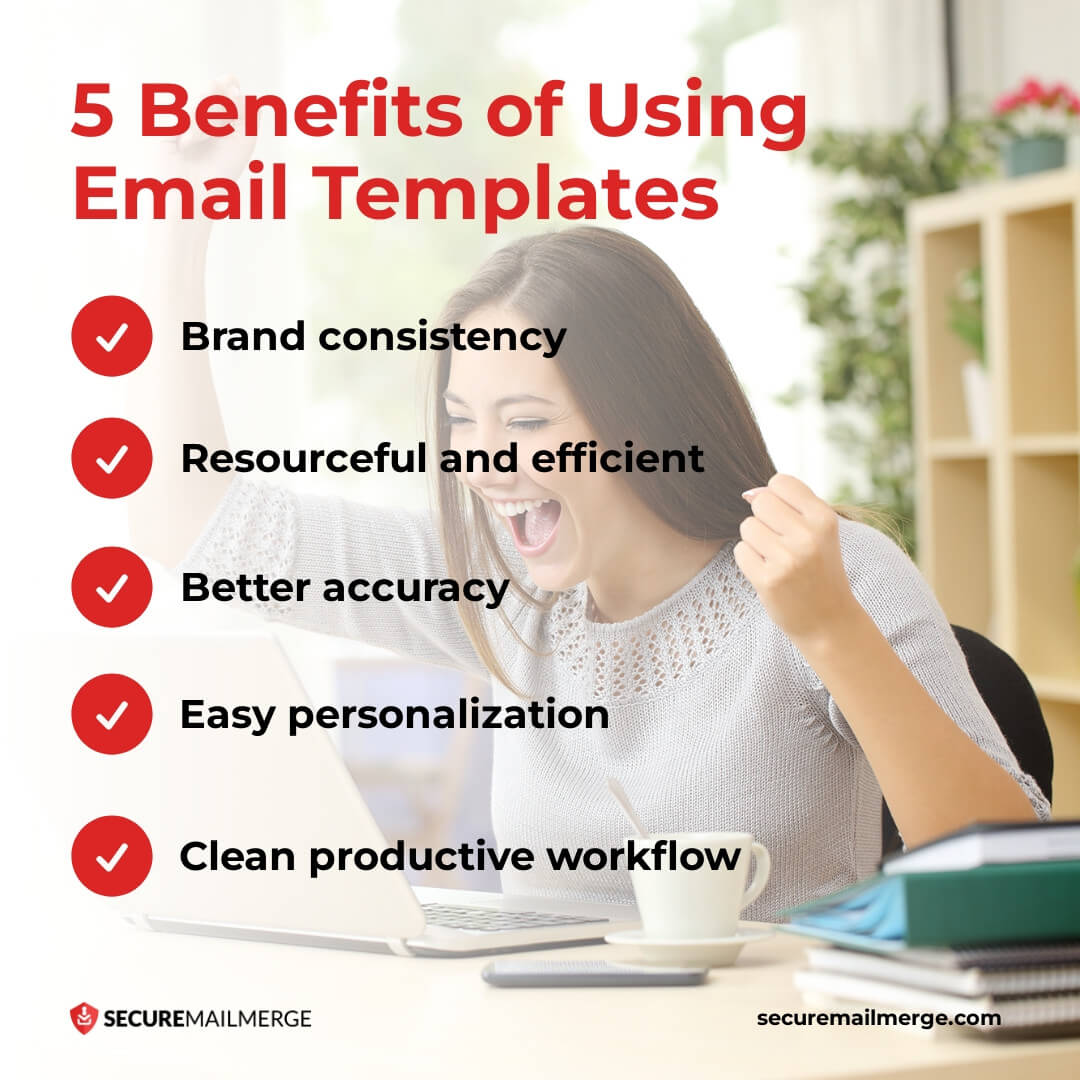
1. It helps with brand consistency
Using email templates in Outlook ensures consistent branding across all your communications. Incorporating your company’s logo, color scheme, and overall visual identity into your templates creates a cohesive and professional image for your brand.
You can also set up a signature on Outlook as part of your templates to automatically sign them off with your or your company’s name. This consistency in branding helps establish credibility and fosters recognition among your recipients.
2. Email templates are more resourceful and time efficient
One of the most significant benefits of email templates is their time savings.
With pre-designed templates for repetitive processes, i.e., client onboarding, you can eliminate the need to start from scratch every time you compose an email. Instead, you can select the appropriate template, customize it as needed, and send it off quickly.
This efficiency allows you to focus more on other essential tasks and ultimately increases productivity, leading to better communications and project completion.
3. They offer improved accuracy and error reduction
When you create template emails in Outlook, you can carefully craft and review the content before saving it as a template.
This process allows you to ensure that your message is accurate, error-free, and aligns with your desired tone and style. By avoiding the need to type repetitive information or risk making mistakes manually, you can maintain high professionalism and minimize the chance of errors in your communications.
4. You can personalize your responses easily
Personalization creates a sense of individual attention and demonstrates that you value the recipient, increasing the likelihood of a positive response. Email templates in Outlook offer this flexibility to personalize your messages while still maintaining consistency and cutting down on the extra hassle.
You can customize each template with recipient-specific information, such as their name, company, or relevant details, making the email more personalized and engaging.
5. They enhance your overall workflow productivity
Using email templates streamlines your workflow and improves productivity.
Whether sending regular updates to your team, responding to common customer inquiries, or reaching out to prospects, templates allow you to generate professional emails with minimal effort quickly. This efficiency will enable you to focus on more strategic and value-added activities within your business.
How to Create Email Templates in Outlook?
Now that you know how important email templates are and why you need them, it’s time to learn how to create Outlook email templates and save them for future use in 5 different ways.
Experiment with these various options and choose the one that best suits your workflow and preferences:
Best Option: TemplateManager365
By far the easiest way to create and use templates directly from within Outlook is to install TemplateManager365. It’s a plugin that lets you store any email with images and attachments as a template for re-use later. You can use folders and in the free personal edition everything is stored in your mailbox, so it’s always available regardless of which computer you are using.
Step 1: Install the TemplateManager365 plugin from the Microsoft Office Add-Ins Store.
Step 2: Compose a new email by clicking the “New Email” button, customize with images and any attachments you want to add.
Step 4: Once the email is ready to be saved as a template, start the plugin from the ribbon bar.
Step 5: Click save and rename the template if you wish.
Using the saved template is just as easy:
Step 1: Create a new email and start the plugin from the ribbon.
Step 2: Select the template you want to use and the subject, body with images and any attachments are automatically added to your email.
Option 2: Save as Outlook templates
Step 1: Launch Outlook and navigate to the “Home” tab.
Step 2: Compose a new email by clicking the “New Email” button.
Step 3: Customize the email with the desired content, including the subject line, body text, and any relevant attachments.
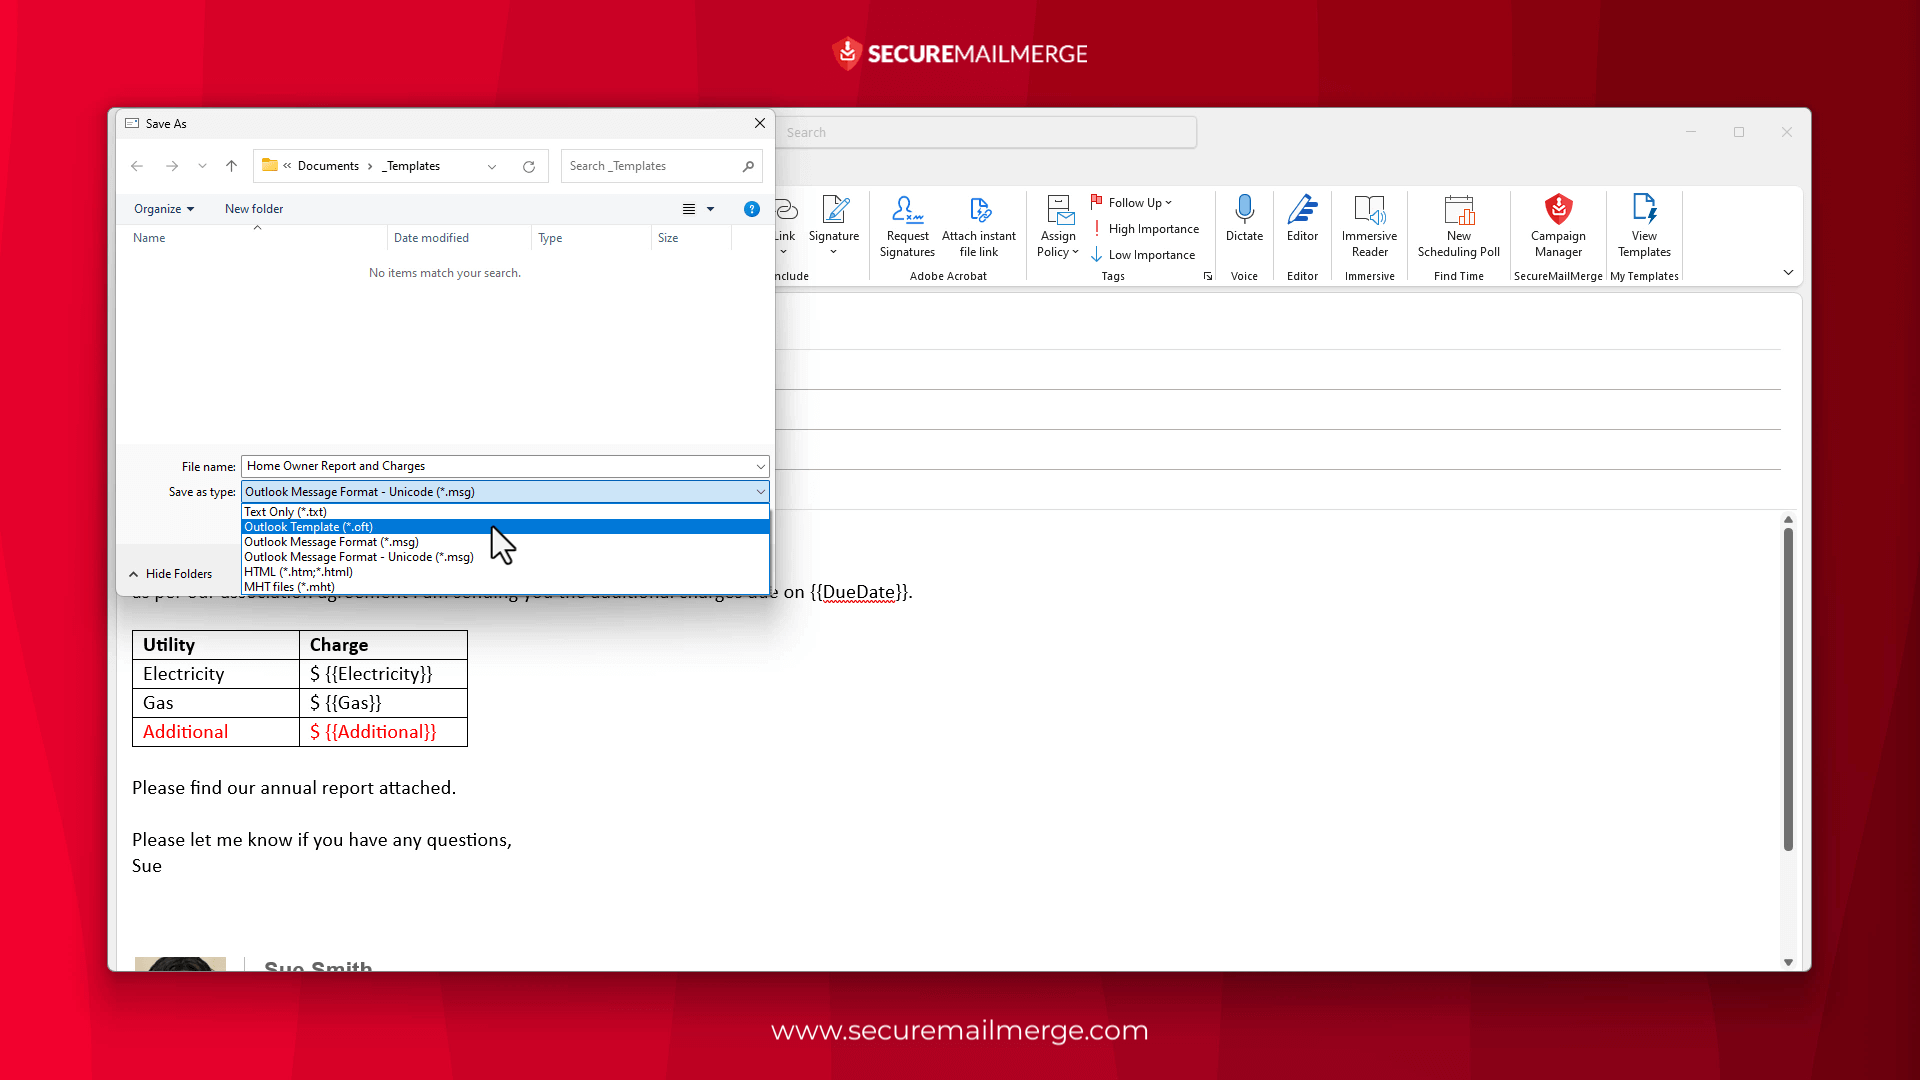
Step 4: Once the email is ready to be saved as a template, go to the “File” tab and click on “Save As.”
Step 5: In the “Save As” dialog box, select “Outlook Template (*.oft)” from the “Save as type” dropdown menu.
Step 6: Choose a location on your computer to save the template and provide a descriptive name for easy identification.
Step 7: Click “Save” to save the email as a template. If you need to access the template for a future email, just double-click on the file in the folder.
Option 3: Quick Parts and AutoText Templates
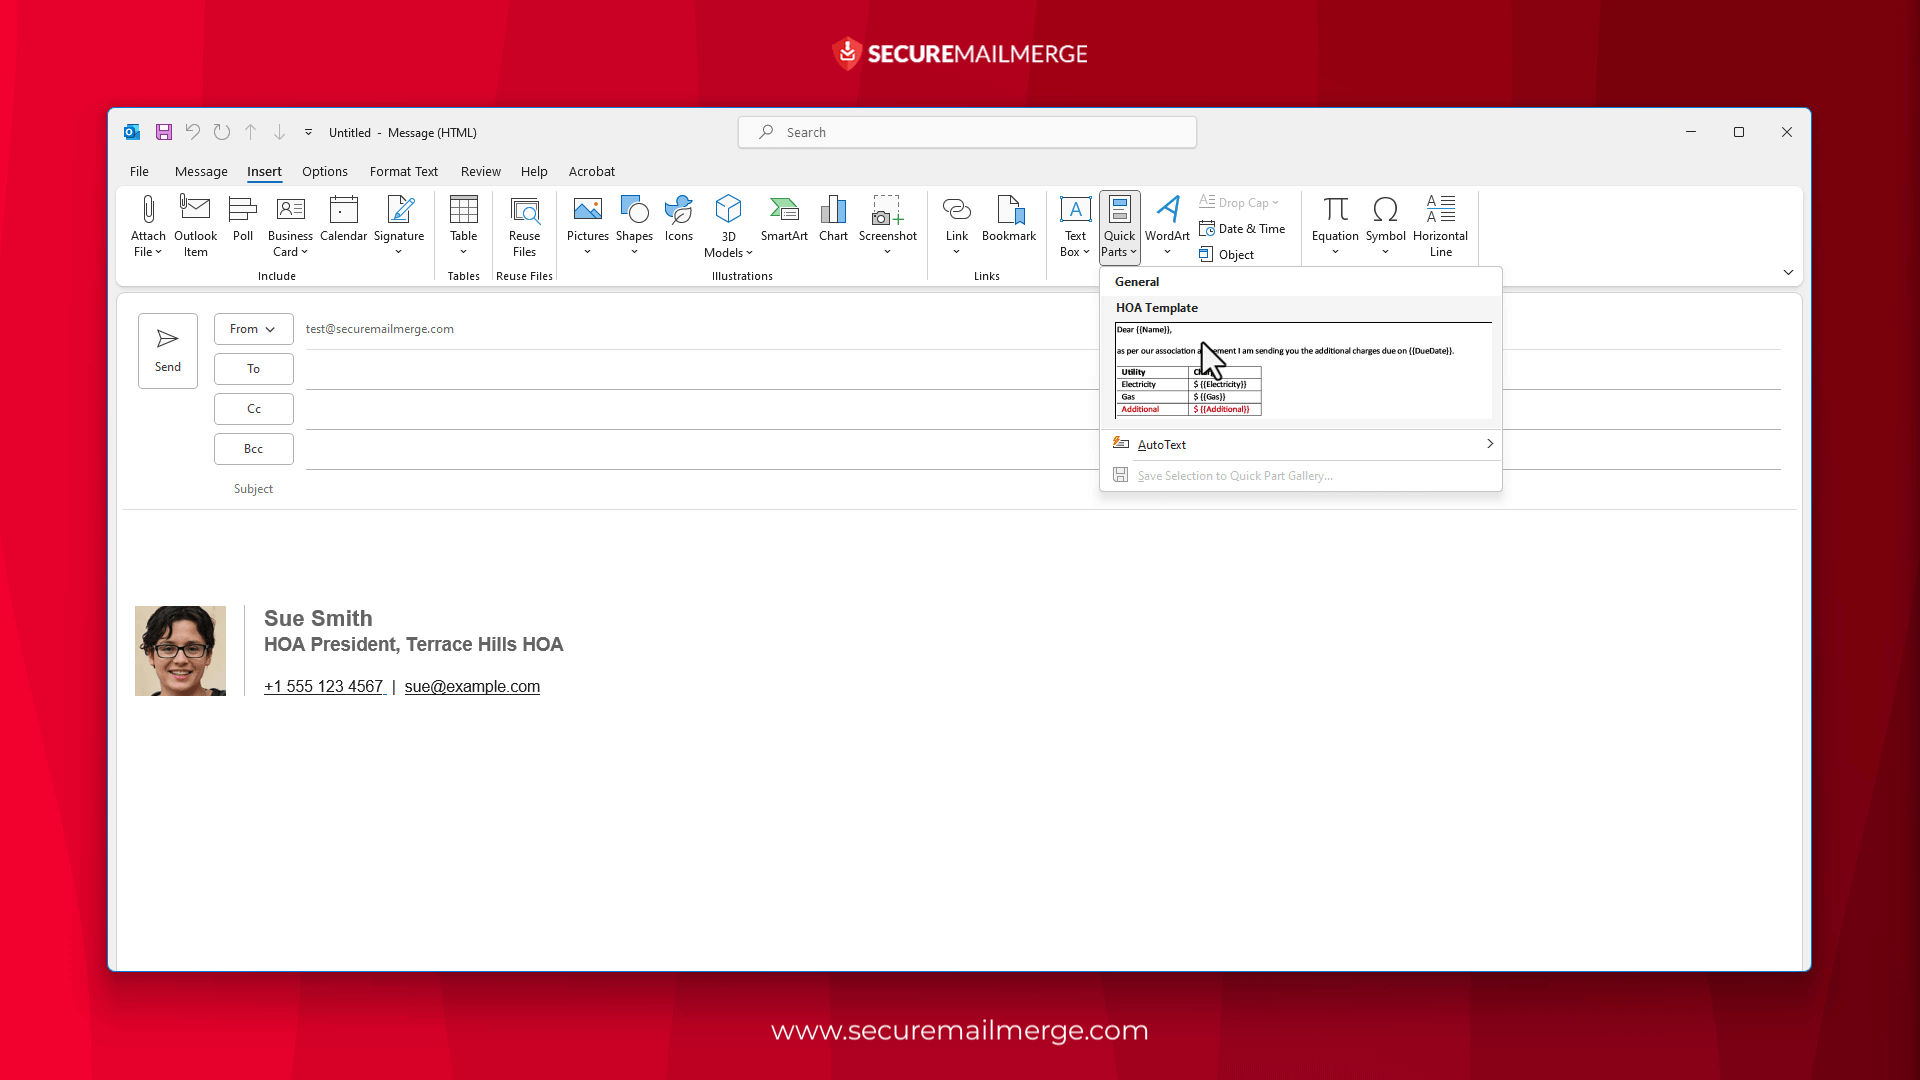
AutoText and Quick Parts are essentially the same features. Only Quick Parts is available for Outlook 2003 and earlier versions. Both are available for the latest Outlook versions.
Step 1: Create a new email or reply to an existing one.
Step 2: Customize the email with the desired content you wish to save as AutoText.
Step 3: Select the content that you want to save as AutoText.
Step 4: On the “Insert” tab, click on the “Quick Parts” button, and choose “AutoText” from the dropdown menu.
Step 5: Click “Save Selection to AutoText Gallery” in the submenu.
Step 6: In the “Create New Building Block” dialog box, provide a name for the AutoText entry, specify any other desired settings, and click ‘OK’ to save.
Step 7: To use the AutoText, simply type the associated AutoText name and press the “F3” key, or go to the “Insert” tab, click on the “Quick Parts” button, and select the desired AutoText entry from the gallery.
Option 4: Using the “My templates” plugin (email body only, with basic formatting)
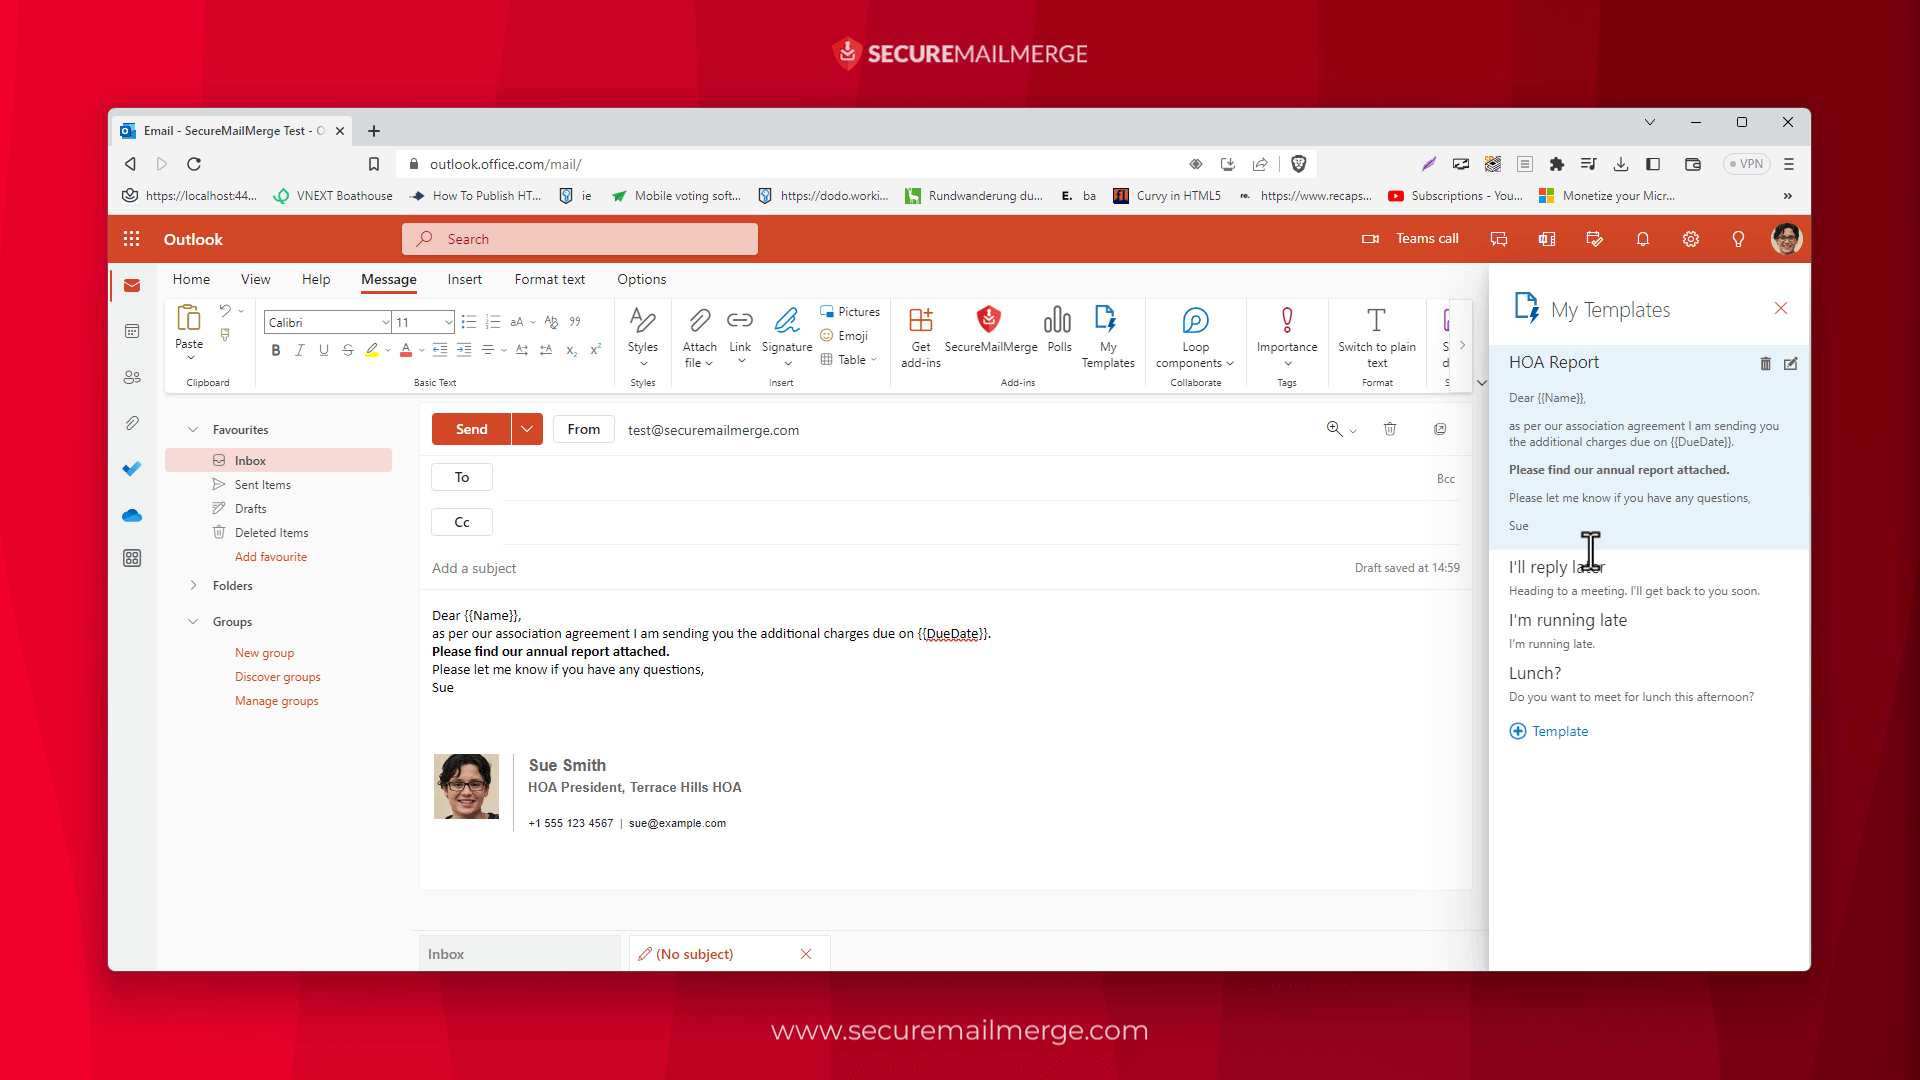
Step 1: Log in to your Outlook Web App account.
Step 2: Click on the “New Email” button to create a new email.
Step 3: Click on the “My templates” add-in in the ribbon menu. This is installed by default, if not you can add it by clicking on the “Get Add-Ins” button.
Step 4: Customize the body with basic formatting like bold or italic.
Step 5: Click save to persist the template.
Step 6: Now you can select the template from the menu and the contents will be pasted into the current email.
Option 5: Create Quick Steps (text-only emails without formatting)
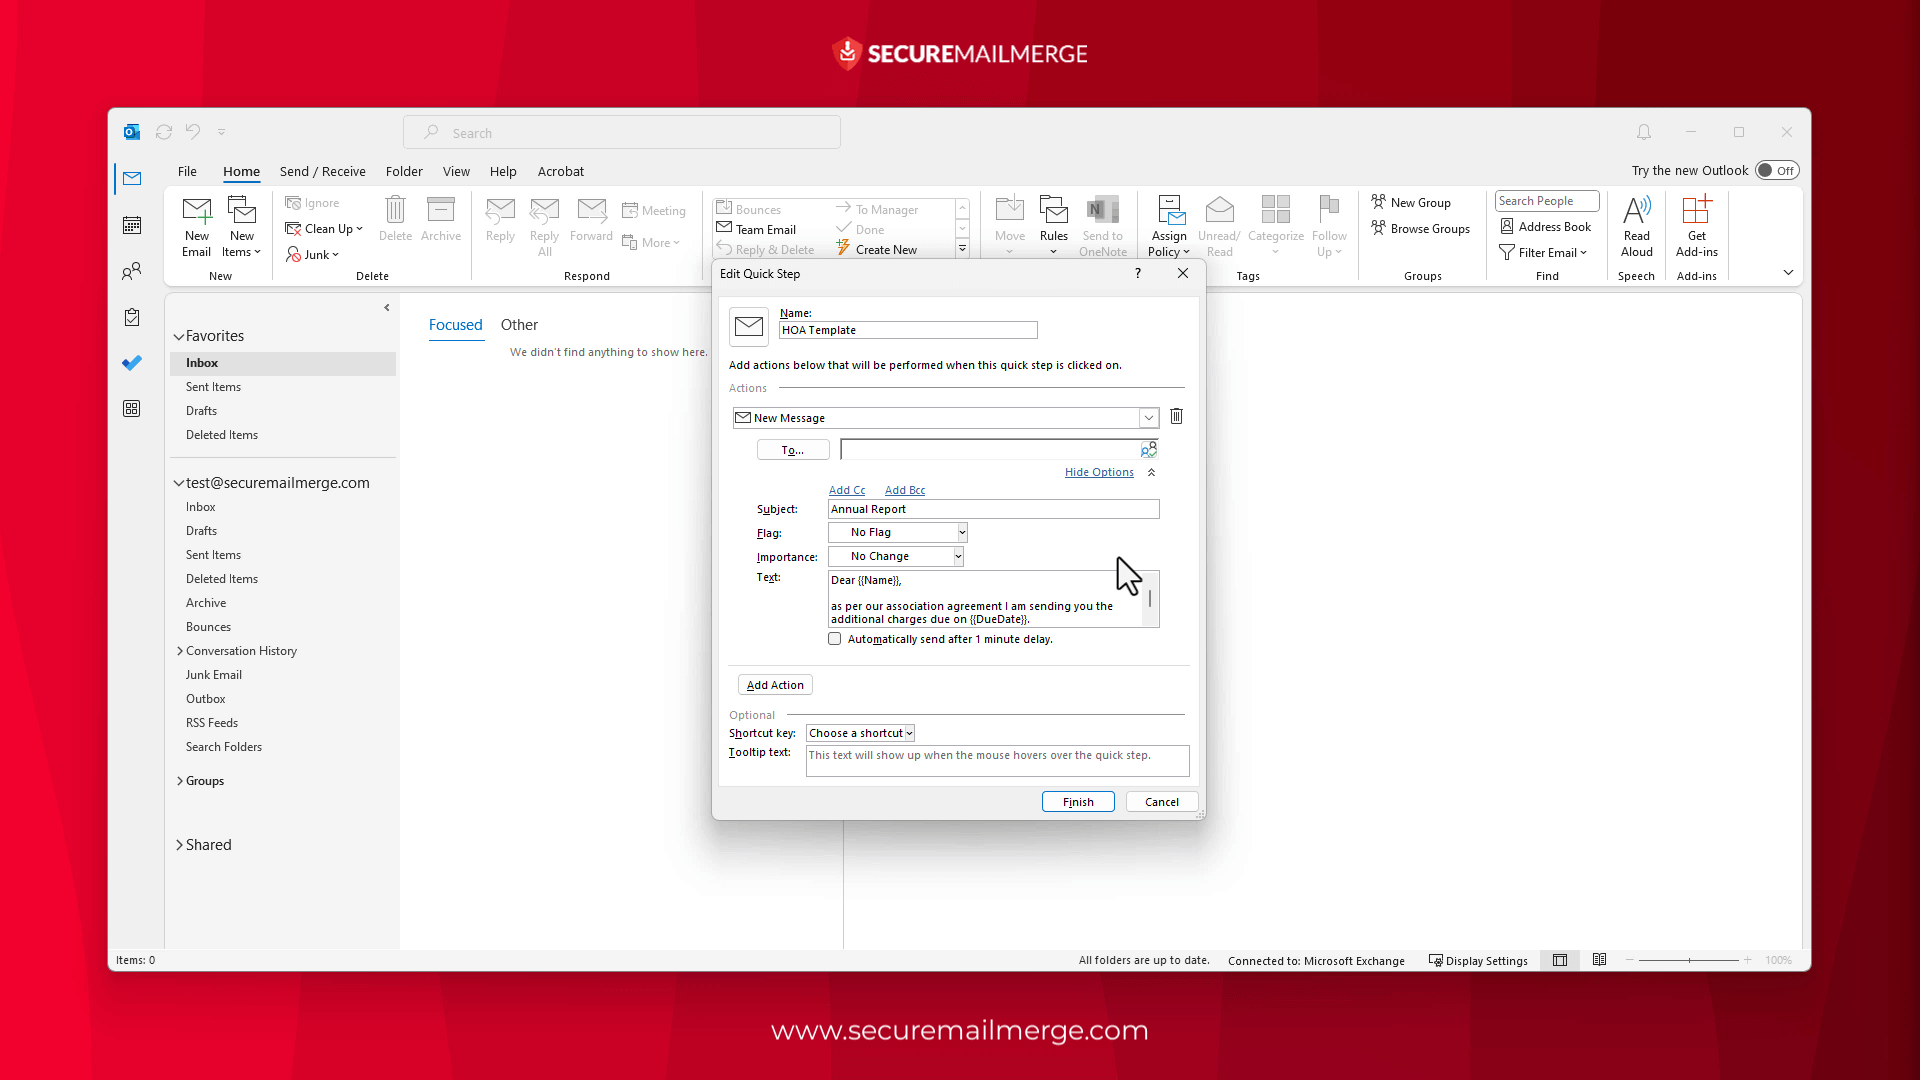
Quick Steps are convenient shortcuts that enable you to execute multiple actions with a single command. One of these actions includes replying with a template or generating a new email using a template as a starting point.
Step 1: Go to the “Home” tab and click on the “Create New” button in the “Quick Steps” group.
Step 2: In the “Edit Quick Step” dialog box, specify a name for the Quick Step and choose the desired actions to be performed (e.g., Welcome Message)
Step 3: Under the “Actions” section, select “New Message” to create a new email and add an action it will take (e.g., Reply All)
Step 4: Customize the email with the desired content and formatting.
Step 5: You can also add other necessary info and shortcut keys to send this Quick Step in response to any email.
Step 6: Click ‘Finish’ after setting up, and the Quick Step will appear on the ribbon.
6 Tips to Create Winning Outlook Email Templates
Creating effective Outlook email templates goes beyond simply copying and pasting content into a predefined format, especially when writing follow-up emails that convert.
To truly win over clients and maximize your email campaign’s success, follow these six essential tips:
1. Define Your Objectives and Audience
Before diving into template creation, clearly define your objectives for each email.
Determine what action or response you want to elicit from your recipients. Additionally, understand your target audience’s preferences, needs, and pain points. Tailoring your templates to specific objectives and audience segments increases the relevance and impact of your emails.
2. Craft a Compelling Subject Line
The subject line is your first chance to grab your recipients’ attention.
Make it concise, engaging, and relevant to the email’s content. A compelling subject line piques curiosity, instills urgency, or offers a clear benefit to entice recipients to open your email. Experiment with different approaches to find the best subject line that resonates with your audience.
3. Design a Professional Email Layout
A visually appealing and professional email layout creates a positive impression and enhances readability. Use a clean, well-organized design that aligns with your brand’s visual identity.
Pay attention to formatting, font choices, and colors to ensure readability across different devices and email clients. A visually cohesive and professional layout builds trust and credibility with your recipients.
4. Personalize Your Template
Personalization adds a human touch to your emails, increasing engagement and relevance. Use recipient variables like their name or company to populate personalized information in your templates dynamically.
Craft your email content conversational, addressing recipients by name if appropriate. Personalized emails demonstrate that you value your recipients as individuals, fostering a stronger connection.
5. Add Relevant Content and Call to Action
Ensure that the content of your email template aligns with your objectives and provides value to the recipient. Communicate the purpose of the email and include relevant information, such as product details, special offers, or event details.
Additionally, include a compelling call to action (CTA) that guides recipients toward the desired action, such as clicking a link, signing up for a webinar, or purchasing. A strong CTA motivates recipients to take the next step, even if it’s as simple as a reply to your email.
6. Test and Optimize Your Template
Continuous improvement is critical to creating winning Outlook email templates.
Test different elements of your template, such as subject lines, content variations, and CTAs, to identify what resonates best with your audience.
Analyze metrics like open rates, click-through rates, and conversion rates to gain insights into the effectiveness of your templates. Based on these results, make data-driven optimizations to refine your templates and maximize their impact.
Examples of Effective Outlook Email Templates
Some emails require templates more than others, like customer support, response to inquiries, sending in forms, or welcoming/ onboarding emails.
If you’ve made it all the way here, you know everything about creating an Outlook email template, and it’s time to implement that knowledge.
So here are some examples to give you inspiration and a headstart on this journey:
Example 1: Sales Follow-up Template
Subject: Follow-up on Our Discussion - [Company Name]
Hi [Prospect’s Name],
I hope this email finds you well. I am following up on our recent conversation regarding [product/service] and answering any further questions you may have. Our team at [Company Name] is committed to providing exceptional solutions tailored to your needs.
I would like to schedule a call or meeting at your convenience to delve deeper into how our [product/service] can address [specific pain point or opportunity] for your organization. In the meantime, I have attached a detailed brochure that provides further information about our offerings.
Please feel free to contact me directly at [your contact information] if you require any additional assistance or specific requirements. I look forward to the opportunity to work with you and help drive [prospect’s organization] toward greater success.
Best regards,
[Your Name]
[Your Contact Information]
Bonus
Getting a reply from follow-ups can be highly challenging. Try out these 5 Free Follow-up Email Templates vetted by our experts and ditch the generic!
Example 2: Client Onboarding Template
Subject: Welcome to [Company Name] - Your Onboarding Journey Begins!
Dear [Client’s Name],
We are thrilled to welcome you to the [Company Name] family! It’s an honor to have you on board, and we’re excited to embark on this journey together.
To ensure a smooth onboarding process, we have prepared a comprehensive guide outlining the steps and resources needed to start. You can find it attached to this email. Please take some time to review the guide, which covers everything from setting up your account to accessing our support channels.
At [Company Name], we are committed to providing excellent support and ensuring your success. If you have any questions or need assistance during the onboarding process, please don’t hesitate to contact our dedicated support team at [support contact information]. We’re here to help!
Best regards,
[Your Name]
[Your Contact Information]
Example 3: Customer Support Template
Dear [Customer’s Name],
Thank you for reaching out to [Company Name] support. We received your inquiry regarding [specific issue/question] and are committed to promptly assisting you.
Our support team is reviewing your request and will provide you with a comprehensive response within [specified timeframe]. In the meantime, please refer to our online knowledge base at [website link] for answers to frequently asked questions and helpful resources.
If you require immediate assistance or have any additional information to provide, please reply to this email or contact our support team directly at [support contact information]. We want to ensure that your experience with [Company Name] is seamless and that we address your concerns effectively.
Thank you for choosing [Company Name]. We appreciate your patience and will do everything possible to resolve your issue and exceed your expectations.
Best regards,
[Your Name]
[Your Contact Information]
Note: These examples only showcase how to structure and format Outlook email templates for different purposes. Customize them according to your specific requirements, incorporating your brand’s tone and style.
SecureMailMerge – The Easier Way to Automate Your Email Campaigns for Outlook
SecureMailMerge is the ultimate plugin for Outlook that is a must-have for entrepreneurs, email marketers, and anyone managing multiple correspondences.
With SecureMailMerge, you can send many emails directly from your Microsoft 365 account, ensuring they appear as if you sent them personally. This enhances deliverability and significantly boosts response rates, as recipients are likelier to engage with personalized and authentic emails.
Some of the standout features include:
- Seamless integration with your personal or shared address book to automate personalized emails.
- Support for various spreadsheet types for recipient selection. Whether you have your recipient data stored in Excel, CSV, TXT, Numbers, OpenDocument, or other formats.
- There are no message or attachment size limitations, allowing you to send large files, lengthy messages, videos, or multiple images as needed.
By leveraging the power of SecureMailMerge, you can achieve faster results and streamline your email communication process more efficiently.
Install SecureMailMerge for Outlook and experience the communication revolution your business needs and deserves.
Enjoyed this article?
We have a whole library of useful articles for you to read
Show me the library of Outlook articles